How to set up parental controls on a CenturyLink modem
CenturyLink modems offer parental controls that help you shield your child from inappropriate content. Use this guide to learn how to block websites and services and create access schedules for devices connected to your WiFi network.
There are also many reputable parental controls programs available on the market today. Read our blog about how to track online activities with parental controls, including a list of five of the best options out there.
Sign in to modem advanced settings to set parental controls
Note: Your modem settings may appear slightly different from the images below, but the steps will be the same.
1. Connect a device to your network over WiFi or using an Ethernet cable connected to your modem. This works best on a tablet or computer.
2. Open a web browser and type http://192.168.0.1 into the web address field.

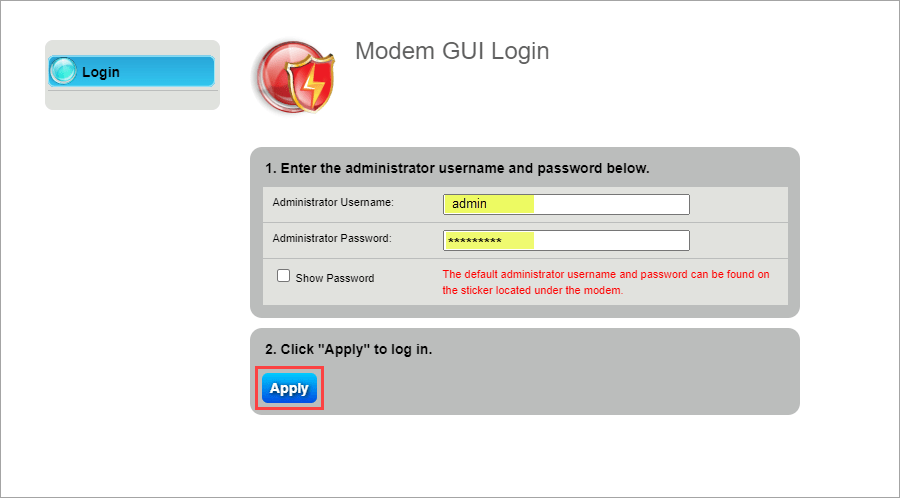
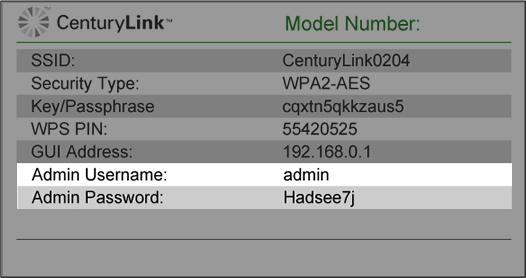
3. Sign in to the modem settings (GUI) using your Admin Username and Admin Password, printed on the sticker.

4. Select Advanced Setup in the main menu.

How to block websites from your modem settings
You can block access to specific websites from the Advanced Setup menu:
1. Select Website Blocking from the left-hand menu of Advanced Setup.
2. Select the device you want to block (such as your child’s laptop or tablet) from the dropdown list, or manually enter the device’s IP address. All devices connected to your network should appear in the drop-down.
3. After selecting the device, enter the website you want to block. You can add multiple sites, one at a time, and they will appear on the “Blocked Website List” at the bottom. You can also click to remove any blocked site from the list if you change your mind or make a mistake.
4. When you’re finished adding or removing websites, click Apply to save your changes.
How to block certain services from your network
You can block services like instant messaging, email, or gaming systems from using your network.
1. Select Service Blocking from the left-hand menu of Advanced Setup.
2. Select the device on which you want to block services from the dropdown list, or manually enter the device’s IP address.
3. Select the service you want to block. For example, you can block instant messaging from your child’s computer or tablet, or block World of Warcraft from being played on the family PC. You can Create New Rule to add more blocks. Just as with the blocked websites list above, you can also remove blocks from the Service Blocking List at the bottom of the screen.
4. When you’re finished adding or removing rules, click Apply to save your changes.
How to set up an access schedule on your WiFi
You can create times of the day or week when your WiFi is disabled, like during homework time, during a family screen time break, or when kids should be unplugging and going to sleep. There are two ways to do this: network-wide, which will affect every connected device, or by device, so that only selected devices are affected.
Set up a network-wide access schedule from your modem settings
This option will affect the entire WiFi network, turning it on or off for all devices.
1. After you sign in to your modem settings, select the Wireless Setup menu.
2. Select Wireless Schedule from the menu on the left-hand side.
3. Select Enable to turn on scheduling mode.
4. Create schedules for your entire family by choosing which days and times you would like your network to be disabled.
5. Select Apply to save your changes.
Set up an access schedule for selected devices
To specify times your WiFi is on for selected devices only, you can manage network access by device through the Advanced Setup section on your modem.
1. Select the Access Scheduler menu option from Advanced Setup.
2. Select the device you want to schedule from the dropdown list, or manually enter the device’s IP address.
3. Set up the days and times you want that device to be able to access the network.
4. Select Apply to save your changes.
Boost your security
Top Internet Topics
-
Check for an outage -
Troubleshooting slow internet -
Speed hub -
Upgrade your service -
WiFi support -
Internet security
View all Internet topics
Top Tools
Was this information helpful?
Support topics


.png)


